Introduction
Blinkit onboarding is the structured registration and compliance process a brand must complete before its products can be stocked and sold through Blinkit's dark store network. For regional FMCG brands, category leaders, and distributors, this process is the gateway to accessing Blinkit's 16.9 million monthly active users and over 50% market share in India's quick commerce sector.
But getting onboarding right is the difference between going live in weeks and losing months to avoidable delays. Brands that underestimate the operational shift required for quick commerce face setbacks across:
- Consistent warehouse replenishment cycles
- 90-day minimum shelf life requirements
- GS1 barcode registration and catalog compliance
- Pincode-level demand visibility and APOB approvals
Each of these becomes a rejection point. While approvals stall, competitors are capturing limited shelf space in dark stores that stock only 25,000 SKUs per location.
The sections below cover every stage — from Seller Hub registration and document submission to catalog setup, APOB approval, and receiving your first Purchase Orders.
Key Takeaways
- Blinkit follows a curated onboarding model where Category Manager approval is mandatory—brands cannot self-list
- Required documents include GST certificate, PAN, FSSAI license (food categories), cancelled cheque, brand authorization letter, and APOB registration
- Standard timeline: 20–45 days, with APOB delays and poor catalog quality being the most common bottlenecks
- Category Managers control SKU approval, trading terms, and promotional slots—your relationship with them directly determines go-live speed
- Commissions range from 2% (SKUs under ₹300) to 18% (SKUs above ₹1,200), with additional inwarding and storage fees on top
What Is the Blinkit Onboarding Process?
Blinkit onboarding is the end-to-end process through which a brand gets verified, listed, and activated on the platform. The full sequence covers:
- Registering as a seller on Blinkit's Seller Hub
- Completing GST and compliance checks
- Getting SKUs approved by a Category Manager
- Setting up APOB registrations for multi-city supply
- Receiving the first Purchase Orders for warehouse stocking
Only brands that clear each stage — verified supply capability, clean GST compliance, and an approved catalogue — move forward.
Unlike Amazon or Flipkart, Blinkit uses a curated model — you cannot self-list. Category Manager approval is mandatory, and APOB registration is a legal prerequisite for multi-city supply. Neither has a direct equivalent on traditional e-commerce platforms. Brands that don't meet Blinkit's operational standards simply don't get in.
Why Getting Blinkit Onboarding Right Matters for Regional Brands
Blinkit's quick commerce model gives regional brands access to high-intent urban buyers who make repeat, high-frequency purchases. With 1,544 dark stores across 100+ cities and a Gross Order Value of ₹11,821 crore in Q1FY26, Blinkit represents a massive growth channel. The broader Indian quick commerce sector accounted for $6-7 billion in 2024 and is projected to grow at over 40% annually through 2030.
When onboarding is treated carelessly, brands lose months to document rejections, APOB approval backlogs, and catalog rework. During that time, competitors capture shelf space in dark stores with limited SKU slots per category.
Regional brands with strong GT/MT presence often underestimate the operational shift quick commerce demands. These requirements are non-negotiable on Blinkit:
- Consistent warehouse replenishment cycles
- 90+ day shelf life on all inbound stock
- GS1 barcodes on every SKU
- Pincode-level demand visibility for forecasting
These operational gaps also carry direct financial consequences. Slow-moving inventory incurs escalating storage fees — ₹1/unit/day for Days 1–30, rising to ₹1.5/unit/day after Day 60 — and packaging non-compliance triggers inwarding rejections that reset the approval clock entirely. Clean onboarding avoids these penalties and builds the replenishment consistency that Blinkit's algorithm rewards with expanded dark store distribution.
How Blinkit Onboarding Works: End-to-End Process
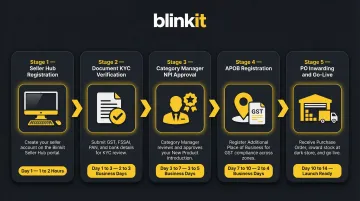
The onboarding process follows five stages: Registration → Document KYC → Category Manager and NPI → APOB Registration → PO-based Inventory Inwarding and Go-Live. This is not a linear self-serve process—each stage has its own approval dependencies, and delays in one stage cascade through the entire timeline.
Step 1: Seller Registration on the Blinkit Seller Hub
Brands apply through Blinkit's Seller Hub, filling in business details, selecting product categories, and uploading initial documents. This step can be completed the same day if all details are in order. The registration captures:
- Business name and GST details
- Primary product categories
- Contact information for account management
- Initial documentation uploads
Unlike open marketplaces, Blinkit's Seller Hub does not allow immediate listing creation. Registration is the first gatekeeper—brands enter a queue for Category Manager assignment.
Step 2: Document Verification and KYC
Mandatory documents required at this stage include:
- GST certificate (name must match PAN and bank account exactly)
- PAN card (business or individual PAN matching GST)
- Cancelled cheque for the registered business
- FSSAI license for food and beverage categories (Central License required for e-commerce FBOs)
- Brand authorization letter for distributors
- Trade license where applicable
Name mismatches across documents are the top rejection trigger at this stage. Brands should prepare a compliance folder before applying, ensuring that the business name on GST, PAN, and bank account is identical. Document verification typically takes 1–5 business days, but incomplete or inconsistent submissions reset the clock.
Step 3: Category Manager Assignment and NPI
The Category Manager (CM) is the most critical relationship in Blinkit onboarding. Unlike other marketplaces, brands cannot go live without CM approval. The CM approves SKUs through the New Product Introduction (NPI) process, negotiates margins and trading terms, and determines which pack sizes and price points will be listed.
The CM's primary lever in this relationship is the NPI approval process, which covers:
- SKU name and variant details
- MRP and selling price
- Pack dimensions and gross weight
- GS1-standard barcode (GTIN-13/EAN-13)
- High-quality product images (front, back, picker, and barcode views)
- Nutritional/ingredient information for applicable categories
- FSSAI details and HSN code
Catalog approval takes 3–7 days, but only if submissions meet Blinkit's strict image standards (clean background, correct dimensions, no watermarks) and barcode requirements. Non-compliant images cause SKU rejection during NPI, resetting the approval timeline.
Pro tip: Start with 3–5 hero SKUs rather than your full catalog. Leading with best-performing products speeds up initial approval and establishes sales velocity before expanding the range.
Step 4: APOB Registration
APOB (Additional Place of Business) registration is mandatory under GST for brands supplying to Blinkit's out-of-state warehouses. Section 2(85) of the CGST Act defines a "place of business" to include warehouses or godowns where a taxable person stores goods. CBIC Circular No. 61/35/2018-GST explicitly clarifies that if a taxpayer stores goods in a third-party warehouse, that location must be declared as an APOB.
Key facts to know before you file:
- Form: REG-14 (core field amendment on the GST portal)
- Timeline: The Tax Official has 15 working days to act; if no action is taken, the amendment is auto-approved
- Multi-city scope: A separate APOB is required for every state where Blinkit operates warehouses
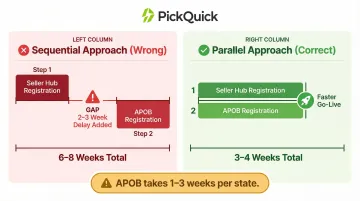
- Start timing: Most brands start this too late—it can push go-live back by 2–3 weeks
Brands targeting multi-city supply should initiate APOB applications in parallel with Seller Hub registration, not after.
Step 5: Purchase Orders, Inventory Inwarding, and Going Live
Once SKUs are live, Blinkit's automated PO system generates demand-driven Purchase Orders. The brand dispatches stock to the assigned warehouse, where the inwarding team verifies:
- Packaging quality and damage-resistant outer cartons
- GS1-standard barcodes (scanability check)
- Quantity and SKU accuracy
- Shelf life (minimum 90 days required at inwarding)
- MRP and manufacturing date visibility
- FSSAI compliance and print quality
Products only become visible to customers after this inwarding step is complete. Brands that dispatch near-expiry stock face rejection, RTV (Return-to-Vendor) charges of ₹5/unit, and potential de-listing.
Key Requirements That Shape Your Blinkit Onboarding Timeline
Document Readiness
The single biggest cause of onboarding delays is submitting incomplete, blurry, or inconsistent documents. The brand name on GST, PAN, and bank account must match exactly. Food and beverage brands need a valid FSSAI license and ingredient disclosure.
Practical tip: Prepare a compliance folder before applying. Scan all documents at high resolution, verify name consistency across all certificates, and ensure your FSSAI license is current and valid for e-commerce operations (Central License required).
Catalog Quality and Barcode Standards
Blinkit enforces strict image standards and requires GS1-standard barcodes (GTIN-13/EAN-13) with the '890' country prefix for India. Non-compliant images cause SKU rejection during NPI, resetting the catalog approval clock.
Image requirements:
- Clean white background
- Correct dimensions (minimum 1000x1000 pixels)
- No watermarks or promotional text
- Four mandatory views: Front of Pack, Back of Pack, Picker Image (outer packaging), Barcode Image (UPC/EAN clearly visible)
Starting with 3–5 hero SKUs rather than the full range speeds up initial approval and allows you to establish sales velocity before expanding.
APOB Timing
APOB approval by the GST Department is outside Blinkit's control and can take 1–3 weeks per state. Brands targeting multi-city supply should initiate APOB applications in parallel with, not after, Seller Hub registration. Waiting until after Seller Hub approval to start APOB registration is a costly sequencing mistake that burns weeks of potential selling time.
Shelf Life Compliance
Blinkit requires a minimum of 90–120 days of remaining shelf life at the time of inwarding. Dispatching near-expiry stock creates compounding problems:
- Inward rejection and return-to-vendor (RTV) charges
- Risk of SKU de-listing for repeat violations
- Disrupted replenishment cycles and dark store availability gaps
Plan production schedules around platform demand, not just offline forecasts.
Category Manager Relationship
The CM's assessment of your brand's commercial viability directly determines how quickly SKU approvals and trading terms get finalized. Coming prepared shortens the cycle considerably. Bring:
- Offline sales data and regional demand evidence
- Competitive pricing arguments
- Proposed launch SKU rationale
The CM controls NPI priority, promotional scheduling, and visibility recommendations. Brands that engage proactively get earlier access to campaign slots and organic visibility boosts.
Common Blinkit Onboarding Mistakes Brands Make
Most onboarding delays are avoidable. The mistakes below consistently push go-live timelines back by weeks — sometimes months — and most stem from process sequencing errors or underestimating platform compliance requirements.
Delaying APOB Applications
The most operationally damaging mistake. Brands that wait until after Seller Hub approval to start APOB registration lose weeks of potential selling time. APOB approval takes 1–3 weeks per state and is entirely outside Blinkit's control. Start APOB applications in parallel with Seller Hub registration to avoid this bottleneck.
Submitting a Full Catalog Before Establishing Traction
Listing 50+ SKUs at once overwhelms the CM review process and increases the chance of partial or delayed approval. Brands should lead with their 3–5 best-performing SKUs to establish a sales velocity baseline before expanding the range. This approach speeds up initial approval and demonstrates commercial viability to the Category Manager.
Ignoring CM Feedback or Being Slow to Respond
The CM controls NPI priority, promotional scheduling, and visibility recommendations. Brands that treat CM communication as low priority risk being deprioritized in approval queues. This relationship compounds over time: brands that collaborate well get earlier access to campaign opportunities and organic visibility boosts.
Sending Non-GS1 Barcodes or Tampered MRP Labels
Inwarding failures caused by barcode or labelling non-compliance are among the most avoidable mistakes. The Legal Metrology (Packaged Commodities) Rules, 2011 require that retail sale price must be printed inclusive of all taxes. Incorrect MRPs create legal metrology issues and trigger inwarding rejections. Invest in proper packaging and GS1-standard barcodes before onboarding.
Attempting Solo Onboarding Without QC Operational Expertise
Brands with strong offline presence often underestimate dark store replenishment. Min-Max optimization, real-time availability tracking, and PO response speed are operational skills that take months to build from scratch.
Working with an experienced QC operator like PickQuick — which manages 10,000+ pincodes and holds pre-existing relationships with Blinkit's Category Managers across multiple cities — cuts go-live timelines by 3–5x compared to brands running the process independently.
Frequently Asked Questions
How does Blinkit onboarding work?
Blinkit onboarding involves registering on the Seller Hub, completing KYC and document verification, getting SKU approval via the NPI process, registering APOBs for each supply state, and fulfilling the first Purchase Orders to go live. The full process typically takes 20–45 days, with APOB registration being the most variable stage.
What is the onboarding fee for Blinkit?
Blinkit does not charge a flat onboarding fee. Instead, brands pay category-based commissions (2%–18% depending on price tier), ₹5/unit inwarding fees, ₹1–₹1.5/unit/day storage charges, and ₹50/order fulfilment fees.
What is the Blinkit picker onboarding process?
"Picker onboarding" refers to Blinkit's process for onboarding delivery partners and dark store pickers—this is a separate HR/gig workforce process entirely distinct from brand or seller onboarding. Readers looking to sell products should refer to the Seller Hub registration process instead.
Who is eligible for Blinkit picker onboarding?
Blinkit picker roles are for individuals applying to work as dark store staff or delivery associates—not for brands or sellers. Eligibility criteria vary by city — interested individuals should apply directly through Blinkit's careers or partner portal.
How much does it cost to open a Blinkit store in India?
Blinkit dark stores are Blinkit-owned infrastructure, not a franchise model available to public sellers. Brands supply inventory to Blinkit's warehouses and pay commissions rather than operating or opening stores themselves. If you're looking to sell products on Blinkit, refer to the Seller Hub registration process outlined in this guide.
How long does Blinkit seller onboarding take?
The standard timeline is 20–45 business days. Document verification takes 1–5 days, catalog/NPI approval 3–7 days, and APOB registration 1–3 weeks per state. Brands with complete documentation can shorten this by running stages in parallel.